


How to paint a
Krootox Rider
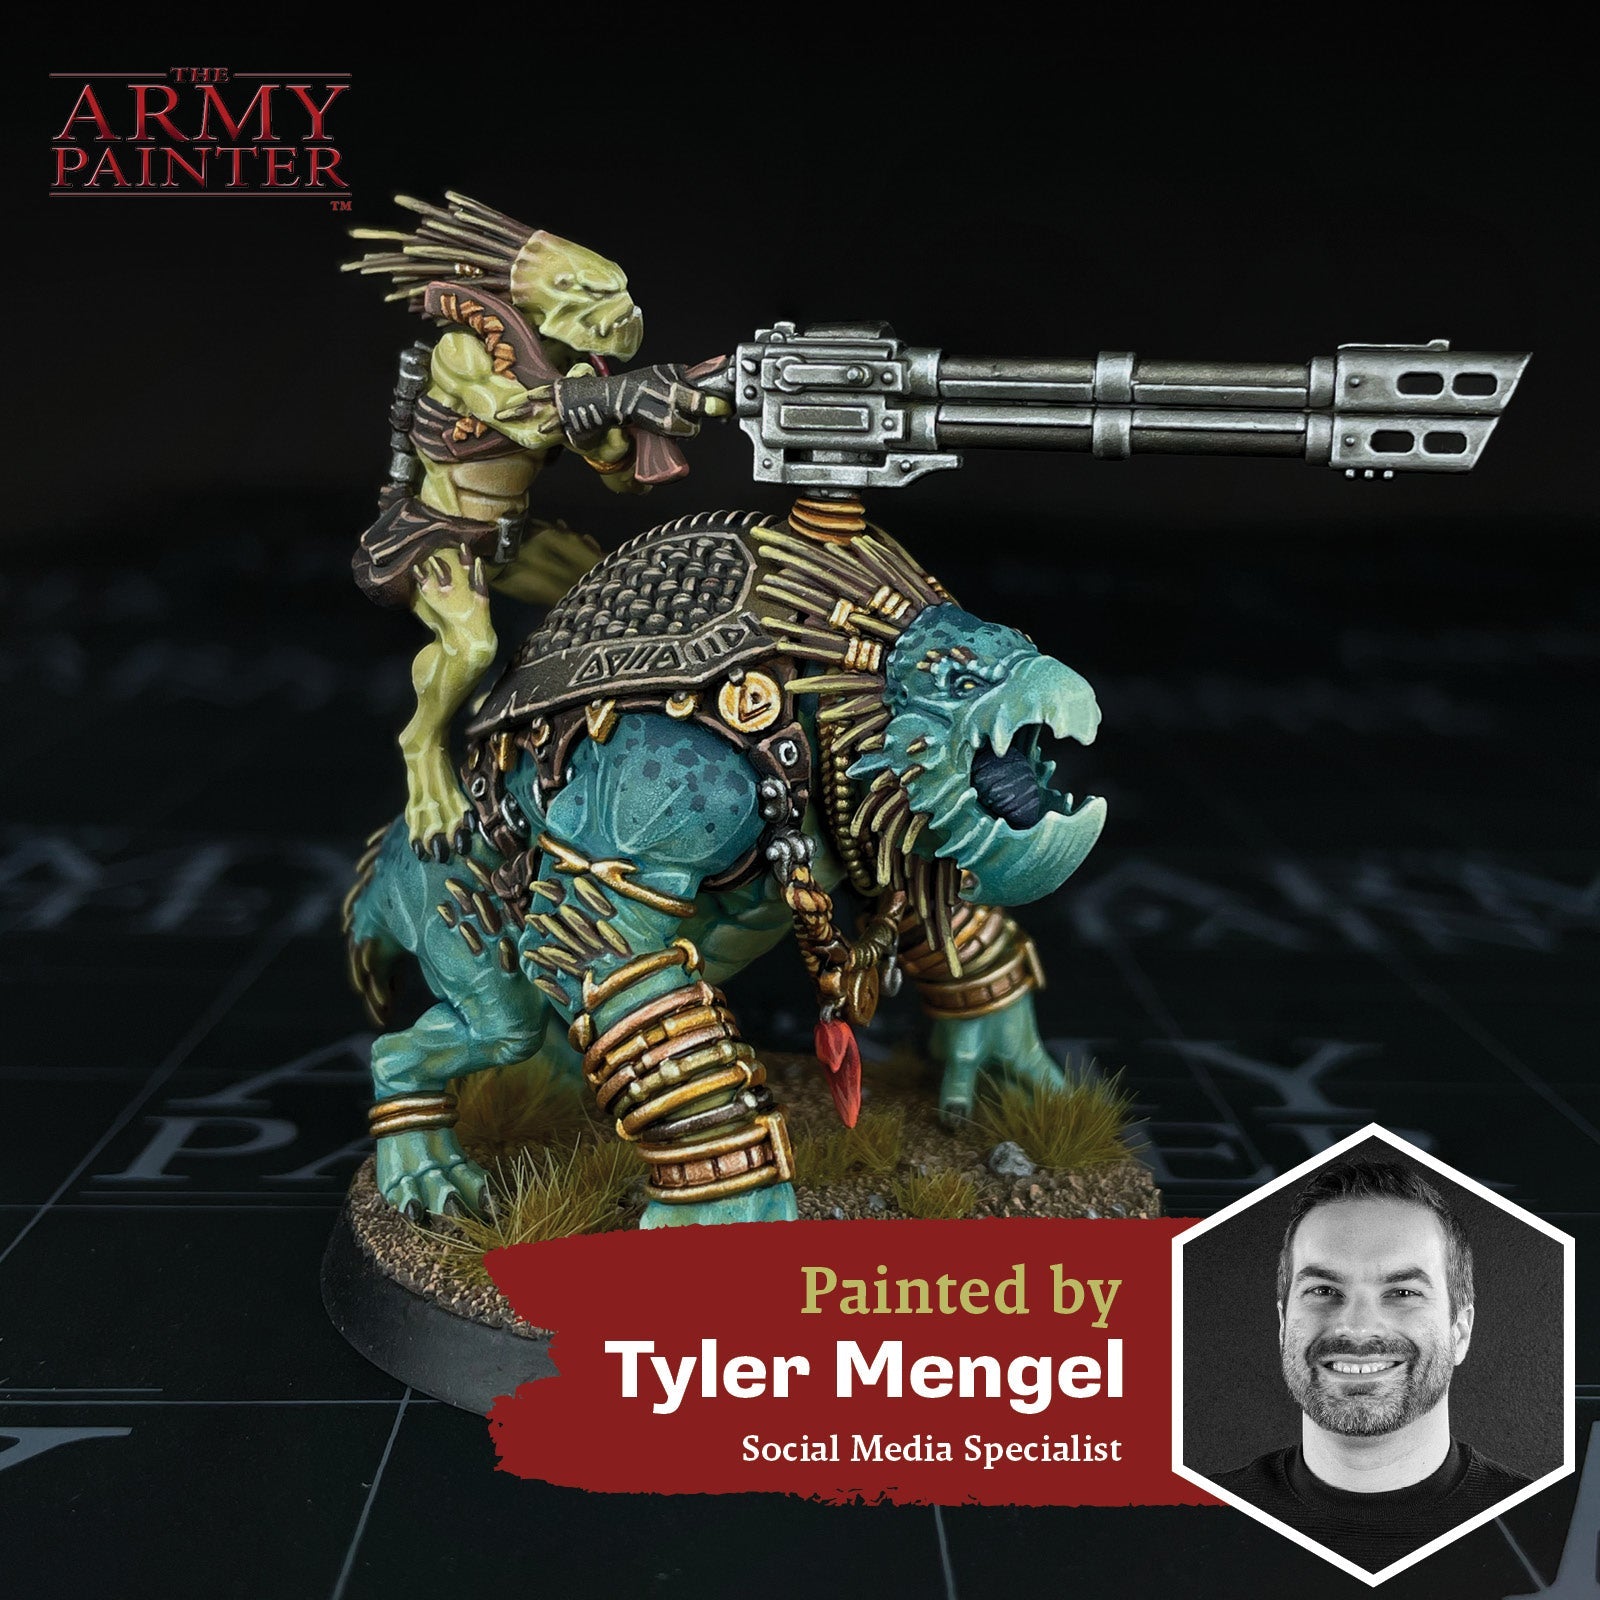
Welcome to the next instalment of The Army Painter Academy: a series where we break down how we paint a miniature step-by-step, complete with pictures for every bit of paint applied along the way.
The Kroot from Warhammer 40,000 are some of Games Workshop’s coolest and most unique-looking aliens. You can really go to town on their skin tones, keeping it grounded and earthy or pushing the otherworldly feel of them. They also offer a nice bit of organic texture to the larger T’au army they are part of. There’s just something so cool about a bunch of leather-clad bird-aliens rampaging around in the center of towering mech suits and highly advanced warriors and tanks.
Arguably, the only thing cooler is sticking one of those aliens on top of another, even larger, bird-alien, and giving them a giant gun—which is why we picked the lumbering Krootox!
This tutorial is broken down by colour segments, starting with the Krootox’s skin and moving onto the Kroot rider, the leathers, and so on. Each section is further broken down into manageable steps by applying one colour at a time. If you’re on a desktop, simply click the arrows at the bottom of each section to scroll through the steps or scroll to the side on your mobile phone.
Every colour on this miniature, other than the primer, comes from our new Warpaints Fanatic range and our Speedpaint range.
Let's get painting!


The Krootox Skin

Step 1
Prime the entire model with our Colour Primer Desert Yellow spray.

Step 2
Next, heavily drybrush with Warpaints Fanatic Skeleton Bone. This gives us a bit of pre-shading and also acts as a nice base tone for all the Speedpaint areas we paint later.

Step 3
Glaze all of the skin on the Krootox with a 1:3 mix (roughly) of Warpaints Fanatic Abyssal Blue to Warpaints Fanatic Stabilizer, so it’s heavily thinned down. Apply 2 coatsbut wait for the first coat to dry entirely before applying the second coat.

Step 4
To deepen the skin tone and add a bit of a gradient, make a similar 1:3 mix of Warpaints Fanatic Deep Ocean Blue to Warpaints Fanatic Stabilizer and apply it to the top parts of the model. Think along the back, shoulders, and head. Apply 3 coats, focusing further and further up the model, so it gets darker the closer to its back you get. Since the Warpaints Fanatic Stabilizer prolongs the drying time slightly, you can quickly rinse off your brush and use it to feather out each layer a bit if you want an even smoother blend.

Step 5
Next, use undiluted Warpaints Fanatic Deep Ocean Blue to paint a mottled pattern near the back, tops of the shoulders, and top of the head, making the dots smaller the further you get from the top. Pick out the tongue, inside of the mouth, and eyes with this colour as well.

Step 6
Highlight the edges of the muscles, fingers, beak, and details on the face using Warpaints Fanatic Skeleton Bone with just a little bit of Warpaints Fanatic Abyssal Blue mixed in.

Step 7
Finally, apply a highlight of Warpaints Fanatic Ancient Stone very sparingly on areas of the face, hands, and feet.

The Kroot Skin

Step 1
Paint the skin on the Kroot rider with Speedpaint Rigor Mortis.

Step 2
Then, coat the skin, except the larger scales on the belly, with a 1:1 mix of Speedpaint Maggot Skin to Speedpaint Medium.

Step 3
Shade these same areas with a 1:1 mix of Warpaints Fanatic Military Shade to Speedpaint Medium.

Step 4
Highlight the green areas with Warpaints Fanatic Necrotic Flesh, picking out ridges and edges of details.

Step 5
Lightly glaze the areas around the quills with Warpaints Fanatic Magenta Tone, the eyes with Warpaints Fanatic Purple Tone, and the beak with Warpaints Fanatic Strong Tone. For this last area, do several thin coats, focusingthe paintmore and more towards the tip of the beak.

Step 6
Apply a final highlight of Warpaints Fanatic Grotesque Green, focusing on the face, hands, and feet.

Step 7
Shade the belly, which was left alone after Step 1, with Warpaints Fanatic Soft Tone.

Step 8
Highlight this with Warpaints Fanatic Skeleton Bone on the edges.

Step 9
Pick out the eyes on both the Kroot and the Krootox with Warpaints Fanatic Fiendish Yellow.

The Leather

Step 1
Tidy up any areas you need to with Warpaints Fanatic Desert Yellow, then coat all the straps and pouches with Speedpaint Satchel Brown.

Step 2
Coat any remaining leather areas, such as the large part on the back of the Krootox, with Speedpaint Noble Skin.

Step 3
Paint the ropes with Speedpaint Hardened Leather.

Step 4
Use Warpaints Fanatic Leather Brown to highlight all the areas that were painted with Speedpaint Satchel Brown.

Step 5
Give those same areas a more refined highlight with Warpaints Fanatic Paratrooper Tan, and also use it as the first highlight on the Speedpaint Noble Skin areas.

Step 6
Apply a more refined highlight to the Speedpaint Noble Skin leather with Warpaints Fanatic Command Khaki.

Step 7
Lastly, highlight the ropes with Warpaints Fanatic Wasteland Clay.

The Red Armour

Step 1
There isn’t a ton of armour on this model; in fact, it’s just the one shoulder pad. Basecoat this with Warpaints Fanatic Dragon Red and also use it to pick out the one tassel hanging from the Krootox’s neck.

Step 2
Shade both areas with Warpaints Fanatic Dark Red Tone.

Step 3
The Kroot like to use simple geometric designs on their armour, so paint a few triangle and diamond shapes on the shoulder pad with Warpaints Fanatic Matt Black.

Step 4
Add some white geometric shapes with Warpaints Fanatic Brainmatter Biege, then weather both areas with some Warpaints Fanatic Dragon Red to make it look like it has been chipped.

Step 5
Lastly, highlight the red with Warpaints Fanatic Angelic Red and the black with Warpaints Fanatic Thunderous Blue.

The Quills, Wood, and Nails

Step 1
Basecoat all the quills as well as the wooden stock on the gun with Warpaints Fanatic Oak Brown.

Step 2
Shade the quills with Warpaints Fanatic Dark Skin Shade and the wood with Warpaints Fanatic Strong Tone.

Step 3
Highlight the quills with Warpaints Fanatic Prairie Ochre, making sure to leave enough of the previous step showing.

Step 4
Finish these off with a more refined highlight of Warpaints Fanatic Burnt Turf near the tips.

Step 5
Highlight the wood with Warpaints Fanatic Dryad Brown, painting a slight wood grain pattern on any areas large enough to show.

Step 6
Finish the wood with a more refined highlight of Warpaints Fanatic Ruddy Umber.

Step 7
Basecoat the nails on both the Kroot and the Krootox with Warpaints Fanatic Matt Black, then highlight them with Warpaints Fanatic Uniform Grey.

The Gold and Bronze

Step 1
This model has quite a bit of bling adorning it. Basecoat all the hanging amulets and the rings in the quills with Warpaints Fanatic Greedy Gold. Basecoat the rest of the bangles and jewellery in either Warpaints Fanatic Greedy Gold, Evil Chrome, Rough Iron, or Tainted Gold. Vary it up to create more interest, especially on all the arm bangles.

Step 2
Shade all of these areas with Warpaints Fanatic Strong Skin Shade.

Step 3
Highlight all of them with Warpaints Fanatic True Brass.

The Silver Metallics

Step 1
Basecoat the gun and ammunition on the Kroot’s back with Warpaints Fanatic Gun Metal.Then, to break up the shape a bit, pick out a few areas on the gun with Warpaints Fanatic Death Metal with a bit of Warpaints Fanatic Gun Metal mixed in.

Step 2
Next, shade all of this with Warpaints Fanatic Dark Tone.

Step 3
Lastly, highlight all of it with Warpaints Fanatic Plate Mail Metal.
With that, your model is done!
Afterwards, we based the model in a simple dirt and grass scheme, but you can base yours however you like to fit in with your collection.
If you plan on using your model for gaming, we highly recommend varnishing it with either our Spray, Warpaints Air, or Warpaints Fanatic varnishes.


Be sure to tell us what you thought of this tutorial format, if you have any suggestions for improvements in the future, or even which models you want us to tackle.
If you paint your own model following one of these guides, tag it with #thearmypainteracademy to share your work!